New Furniture
24 Aug 2013 · by bathompso · in Uncategorized
For a long time, Chrissy has nagged me to live healthier. “Go for a run,” and “what fruit did you eat today?” were some of the many (legitimate) comments I heard from her. The problem is: (a) I’m lazy, (b) the Texas summer is too dang hot to run in, and (c) I really like unhealthy foods (Mt Dew, Pizza, Taco Bell, etc.)
This past week I realized there was something I could do for my health that wouldn’t require a lot of money, and would still allow me to live my somewhat lazy and gluttonous lifestyle: a standing desk.
Lots of studies have shown that sitting for many hours per day decreases your life span and increases your chance of dying from some heart disease. If that wasn’t enough motivation for me, I also have noticed that I have terrible posture sitting at the computer (I always lean in toward the screen), and my back has begun to hurt after marathon research sessions. Standing automatically removes my tendency to lean in, and therefore improves my back pain and posture in general.
There were some that mentioned standing for extended periods would not be enjoyable, but much of my work (like much of astronomy) isn’t a marathon session. I stand at my desk for 1-2 hours, getting a script or software package configured correctly, then unleash it on my massive dataset and relax for 3-4 hours. When I come back, I simply look at the reduced data. Standing for short bouts (instead of sitting continuously), will honestly not be that bad.
The Plan
I got my basic plan for my standing desk from here. Although IKEA is quite a hike from me, the low price was attractive and it seemed to have minimal manual labor to get working.
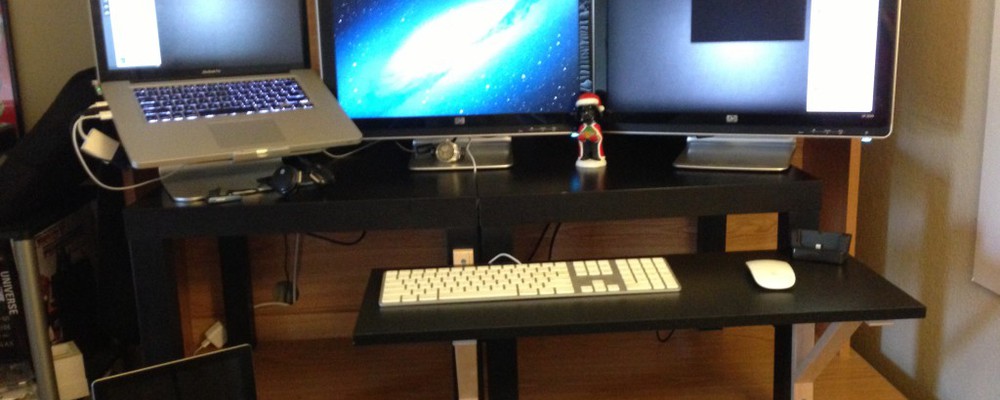
I currently have a triple-monitor setup at home: 15″ Macbook Pro on a stand + 2×20″ monitors. Another reason I chose this desk plan is because it was easy to extend to the width I needed to hold all three components.
The Materials
If you want to build the same desk setup I did, here’s what you’ll need:
- IKEA Lack Side Table [2x$9.99]: Each one is 22″x22″, so I bought two to put side-to-side. Vary the number you buy to fit your setup (I measured before I left and found everything would fit on ~40″ of desk width).
- IKEA EKBY Viktor Shelf [$5.99]: This is the shelf that will hold your keyboard / mouse. I think there are multiple widths, but the 11″ seems to be more than enough real estate for a keyboard and mouse along with some extra room for hand rests.
- IKEA EKBY Valter Bracket [2x$4.00]: You’ll need two of these to hold the shelf onto your side tables. At my IKEA they did not appear to have any colors besides plain wood, but there are many colors available online. Make sure to match that color to one of the other components! Also, make sure you get the 11″ brackets to match your 11″ shelf. If not, it will not be secure!
- #10 x 3″ Sheet Metal Screws [2x$1.19]: The original instructions for this desk used regular screws to hold the brackets to the side tables. The legs of the side tables seem to be hollow, and therefore many people do not trust it to hold the weight of their typing and other activities. Many suggested to use 3″ bolts to hold the brackets on, but as I didn’t have a drill to make holes for these brackets, I went with screws instead.
- #10 Washers and Lock Nuts [$2.38]: Although the screws go entirely through the table leg, the material is not strong, and therefore I secured everything with lock nuts. Make sure to get the same size as your screws!
So there’s all the materials I used. Adding everything up, we have a total of $38.73 + tax. It’s a bit more than the $22 stated in the original plan, but I aded a bit of cost myself requiring the extra table + special screws, nuts, washers. Still not bad considering the cost of a regular desk.
The Process
- First, you want to assemble the end tables. Place them on your desk and determine where you want to place the brackets. First, determine which legs you want to place the brackets in. As we won’t be screwing the brackets into the shelf, you can choose any two legs that provide enough support (don’t choose legs that are right next to each other). The keyboard should be just at or below your elbow (so your arm makes a near-perfect right angle when typing), so make a mark on the two legs you chose about where the screws for the bracket should be.
- To screw the brackets in, I found it easier to remove the two legs you want to use for the brackets and attach them while laying on the ground. This gives you more leverage (the outside layer of the table leg is quite tough), and allows you to make sure things are aligned (as they’ll be lying right next to one another). Don’t worry about perfection when it comes to alignment: mine were about 1/8″ off of each other, and you can’t tell.
- Once the brackets are attached, screw the legs back in, and set your tables back up on the desk. Place the shelf on the brackets, and you’re ready to go!
Final Thoughts
As I’ve only used it for a few hours, I can’t make any solid judgments on how I’ll like the standing desk. I appreciate all the extra desk space it gives me though, as I can store lots of stuff on the original desk surface and still have almost the same amount of desk space as before.
I would recommend getting a soft kitchen mat to stand on, as even on carpet I can feel the hard floor. This will probably not only save strain in your legs, but also the discomfort that may cause you to lose faith in the standing desk after a little while.
If there is a time when you just can’t stand anymore, the standing desk is almost a perfect height for a bar stool. We have an extra one that isn’t used at our breakfast bar, and it’s sitting off to the side in the office now for emergency support.
There will be an update in a few weeks after I’ve used the desk more regularly (and my legs have adjusted to standing for extended periods).